| Rambler American Restoration
Back to American Restoration Index
Fixing the Leaky Windshield in my `68 American
Part 2 - Dash Removal
October 7, 2001
Not scared in the least bit by relatively good fortune
in the first step in fixing the leaky windshield, our brave car nut continues on in his
quest for dry carpet...
On Saturday, October 6th, 2001, I tackled the
next big job prior to fixing the rust discovered last week -- removal
of the dash board. After further reflection, I decided not to press my luck and leave the
fenders alone for now. I also did not remove the remains of the headliner yet. I want to
consult with an automotive upholstery shop prior to removal in case there is anything they
need to know about it.
Luckily, I had previously removed a dash from my parts car
so I had a pretty good idea of what I needed to do. Removal of the dash is straight
forward but alas, there is no "Dashboard Removal and Installation" section in
the TSM. Dash removal consists of the following steps: remove all the junk attached to it
(removal of each part is, however, covered in the TSM) and remove the dashboard itself.
Remove all the junk attached to it
The first step in removing the dash is to remove all of the
junk attached to it. Since my car was a factory stripper, I didn't have a bunch of extras
to remove that I didn't install myself. I highly recommend that you purchase and consult a
factory service manual for this step in the removal especially if you have a factory A/C
system. Also, it will help if you keep a pen and paper nearby so you can make notes about
how things fit together and also to keep track of any parts you'll need to purchase or
repair prior to reassembly. Just in this small area of the car, I came up with a list of
about 12 items that either need replaced or repaired before I put the dash back together.
Here's the order in which things came out of my dash:
- Ash tray and bracket
- Oil pressure gauge (this is an aftermarket item I added
after the engine was rebuilt)
- Radio
- Glove box door, check strap and bumper, and glove box
- Cigar lighter
- Ignition switch
- Wiper switch
- Headlight switch
- Instrument trim panel (this is only on 220 model cars)
- Instrument panel
- Weather Eye (the name given to the heat and ventilation
system) control
- Main wire harness to dash straps (expect these to break,
they are available from your friendly AMC parts supplier)
- Defroster duct. Be very careful removing it. After 34 years,
it can be very fragile.
Remove the dashboard itself
Now for the fun part -- removing the dash. This is not
covered by the TSM. Listed below are the steps I followed to remove the dashboard. Also,
if you are just removing the dash, you do not need to remove the windshield first.
Start by removing the steering wheel. Remove the bracket
that attaches the steering column to the dash. There are a total of 7 fasteners (3 are
bracket to dash, 4 are bracket to steering column). Once they are removed, a wedge shaped
part will fall out from behind the dash. Unbolt the support rods from the cowl and remove
them. There is a clip on the end of these rods that will keep them in place. Place a nut
on the end of the rod and hit it hard with a hammer to release the clip. WARNING!
Starting with the 1967 model year, AMC began using energy absorbing steering columns.
These columns are very easily destroyed when they are not supported by all of the
brackets. DO NOT LET THE STEERING COLUMN SUPPORT THE WEIGHT OF THE DASH!
Next, remove the kick panels (these are the plastic panels
under the dash that have the vent doors in them) and the bolts holding the bottom of the
dash to the sides of the car. Remove the row of Philips head screws on the top of the
dash. If you have not removed the windshield, this row of screws is covered by the
windshield gasket. You can simply lift the lower edge of the gasket to get at them. Remove
the dash from the car. Note: the dash is a tight fit. You will need to wiggle it to get it
out of the car. If you have removed your windshield, it will be easiest to remove through
the windshield opening. During removal, the clips that held the steering column
support rods and a pair of washers will fall out. Remember, DO NOT LET THE STEERING COLUMN
SUPPORT THE WEIGHT OF THE DASH!
Once the dash is out of the car, you will need to provide
support for the steering column so it does not bend under its own weight. If it bends, you
cannot safely fix it and it must be replaced. I used some welding wire from my MIG welder
to tie it to the brake pedal support bracket. You could also reattach the column to dash
bracket. If you use the bracket, make sure you do not exceed the factory torque specs for
the attaching bolts. If you do, you can damage components of the energy absorbing
mechanism which can make the car unsafe in a collision.
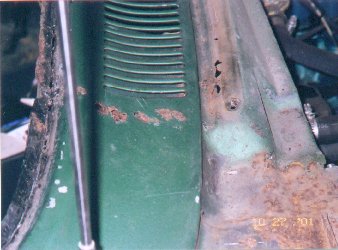
Inspecting the firewall and the stuff I removed
After I removed the dash, I spent a few minutes sifting
through the junk that landed on the floor of the car to make sure I picked up every screw,
clip, and chunk of broken part off of the floor of the car. I then swept the firewall off,
grabbed my drop-light and did a very careful inspection of the firewall. Anything that
looked suspect (that is, it was rusty or discolored) was poked at with my trusty awl to
make sure it was solid. In another stroke of luck, I found no problems. In fact, most of
my "rust" on the firewall was actually stains from the windshield molding clips.
The one exception is, of course, where the pinch weld is rusty (this rusted from the
outside of the car).
I then turned my attention to the stuff I removed from the
car. The only real surprise was that two of the mounting tabs for the defroster duct were
broken off. Everything else just needs to be cleaned up and painted with the exception of
the trashed dash pad. I'll have the one from my parts car repaired (it has one small
crack) and reinstall it instead. I'll hang on to the one that came with the car and send
it out to be rebuilt later.
Up Next: Removing body parts (the
car's, not mine).
Last Updated
01/04/04 09:00:06 PM |