Matt's Old Cars.com
Fiddling with Rambler's since 1995
Project Charity: AMX
Technical Information
Photo Gallery
Rambler American Restoration
1978 El Camino
1967 Rambler American
2007 Dodge Ram
1984 Dodge Ramcharger
Links
FAQ
Send me an e-mail:
Contact Form
Driver's Side Quarter & Rocker Panels
Part 2 - I'm a gas welding fool!
Back to American Restoration Index
April 25, 2003
Well, at least the fool part is right! In the last installment, I was left with two things to do before I could start on the actual replacement. The first was to un-braze two joints. The second was to remove the spot welds holding the trunk drop off panel to the quarter skin. This installment is about un-brazing those joints and also learning from a few mistakes I made previously.
I just hate it when I have to buy new tools!
To un-braze the joints, you need to use an oxy-acetylene torch since the brass used in the joint melts at a fairly high temperature. Since I didn't have any equipment for this, I had to buy it (and we all know how much a car guy/girl hates having to buy tools). There are a few routes I could have gone.
The least expensive is a kit that you can get at most hardware stores or home centers. It uses two very small canisters for the fuel and oxygen. These run about $50-$60. The big problem with them is that you only get about 10 minutes or so out the canisters and it's about $20 to replace them. Needless to say, this can get expensive very quickly. These also are very limited in how much control you have over temperature.
The next option was to get a portable torch kit. These range in price from about $300 - $400. You get a regular torch set with regulators and two slightly larger fuel and oxygen tanks that are good for about an hour. These kits can be used with bigger tanks but my main concern with them was the size of the tanks that come with the kit. About half of the cost of these kits is the tanks themselves. To get bigger tanks, you have to buy them from a gas supplier and they are expensive. Since there is not much market for little tanks, you probably will not get anything for the ones that came with the kit. On the positive side, the entire setup is very light and you can buy larger tips for the torch to handle bigger stuff.
The third option, and the one I went with, was to step up to a regular set of torch and tanks. The setup I went with is a Victor Metalcraft torch and regulator set with medium size tanks. I also picked up a #2 welding tip (the kit has #0 tips for welding and cutting) and some brazing rods. This set me back about $620 and I also bought a cart for the tanks for another $100. There are some things that I could have done to reduce the initial cost slightly but after talking with the salesman, I think I got the best bang for the buck. The biggest one would be to rent the tanks. The gas supplier I use would charge me about $30 a month plus gas to rent tanks. I didn't do this since my use of the torch is likely to be sporadic at best and at $30 a month, it would have ended up costing me more after a year and running back and forth to get tanks if I only get them when I need them is a hassle. The other thing I could have done was to get the small tanks. This would have saved about $40 but it costs almost as much to refill the small tanks as it does the large ones and they only last about half the time of the medium ones. Large tanks would have added about $200 to the cost and doubled the use time from the medium tanks. The actual time you get out of the tanks varies but the medium ones give about 5 hours on average.
Learning from my mistakes
I want to point out that none of the mistakes I've made so far are fatal, but if I had started with removing the quarter from the car first, I would have some major repair work to do.
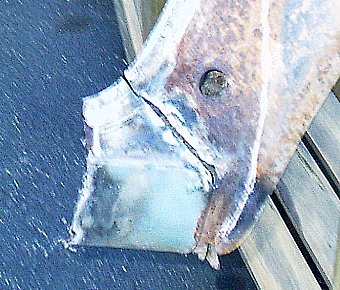
This picture shows the worst of the mistakes I've made so far. Notice that when I cut the brazed joint a few weeks ago, I cut through the rocker panel where it starts to go up over the wheel house. The part to the left of the white chalk line is part of the outer rocker panel and extends to the top of the wheel house. This cut also made it very difficult to separate the quarter skin from the rocker panel since there was no longer a good joint to pry between the two panels.
Cutting the brazed joint first was also a mistake at the top of the door jamb. On that joint, it wasn't quite as bad to separate the panels but I did also cut some structural panels that would have needed repairs if I did this to the car first.
Other stuff I learned about how the car was put together
After I had the brazed together stuff separated, I took some time studying how the car is put together to refine my plan of attack for the car itself. It appears that it went together in this way:
- Inner and middle rocker panel sections attached to inner wheel house and inner door jamb panels which are attached to the trunk and rear seat pans
- Outer wheel house panel attached to inner
- Outer rocker panel attached to outer wheel house
- Trunk drop off attached to trunk floor
- Quarter skin attached to trunk drop off, outer rocker, inner door jamb, and outer wheel house panels
- Roof skin attached to car
My original plan involved replacing the entire outer wheel house and quarter panel. After seeing how the car appears to have been constructed, doing this will require considerably more work than I was planning on. The new plan is to patch the outer wheel house and replace the lower half of the quarter panel. I will not be touching the door jamb or the joint between the quarter skin and tail light panel.
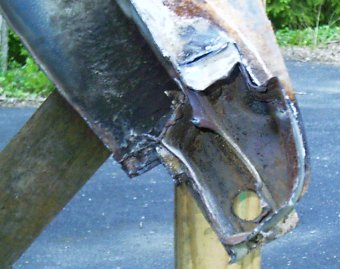
On the subject of the rocker panel, here's a cut away view showing all three panels.
A worm's eye view of the rot I'm fixing
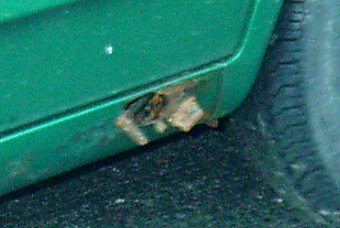
Here's the rotted rocker panel. The picture's fuzzy so it's a little hard to see but the darker green areas to the left of the hole are where the panel is about to rust through. The section of rocker I need to fix goes about halfway between the end and the leading edge of the door.
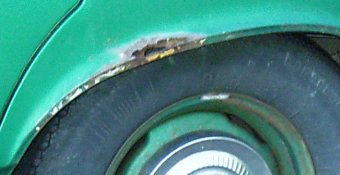
Here's the rotted lip of the wheel opening. The white spots are where body filler was used to "fix" the rust previously. The hole at the top goes through both the quarter panel and the wheel house.
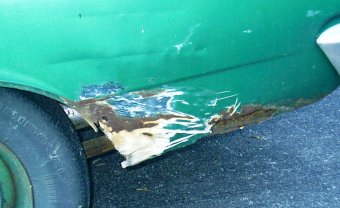
Here's the worst part of the quarter. The body filler in the bottom is over an inch thick in places. The bottom of the quarter and most of the bottom of the trunk drop off panel are rotted away. This was all packed with body filler prior to replacing the rear springs (it fell out when I took my impact wrench to the axle u-bolts). The area between the two creases is bowed out. It looks like something heavy got loose in the trunk at some point and smashed into the driver's side of it. This damage (both rust and the panel bowed out) is very typical of cars of this era.
Up next: Part 3
- Rocker rust and another mouse nest
Last Updated 02/15/04 04:59:20 PM