Matt's Old Cars.com
Fiddling with Rambler's since 1995
Project Charity: AMX
Technical Information
Photo Gallery
Rambler American Restoration
1978 El Camino
1967 Rambler American
2007 Dodge Ram
1984 Dodge Ramcharger
Links
FAQ
Send me an e-mail:
Contact Form
Driver's Side Quarter & Rocker Panels
Part 17 - Rocker Rust -- Getting Ready For Paint
Back to American Restoration Index
May 23, 2004
As of yesterday, all of the body work on the rocker panel has been completed and I'm ready to start on paint prep. Here's what it now looks like near the "B" pillar:
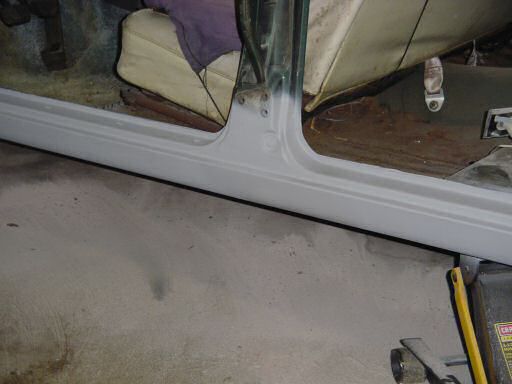
Here's what it looks like at the "C" pillar:
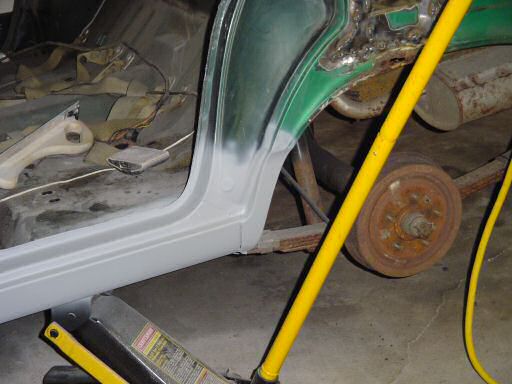
Notice how nice and smooth the part of the quarter panel that wraps under the rocker cover looks? Compare that with what it looked like after I took the old cover off. One last word on the topic of body filler: When you're sanding, be very careful about the condition of your paper! I tore a sheet and didn't stop to replace it because I was almost done sanding. The torn piece folded over and I was rewarded with a gash in near perfect body filler on the face of the cover near the "B" pillar. It was an easy fix with some spot putty but it ended up costing me about a half hour.
One of the other repairs I get to make as a side effect of this project is to "fix" the hole in the side of the car I made on Happy Monday. I ended up cutting out four pieces of metal to make a hole big enough to put the mount for the striker back in place and since I didn't really care about the cuts I was making at the time, I ended up with some very big gaps when all of the pieces were put back together. Since I had to wait for the spot putty I mentioned above to dry, I decided to finish putting the pieces back together.
Since the quarter panel's going to be replaced one of these days, I decided to take a bunch of shortcuts that will ultimately cause the repair to fail (think of this as the auto body equivalent of wrapping a split radiator hose with duct tape until you can replace the hose). In this case, the only things I care about are that it has to look decent for a short time and that it's quick. I only thought to grab the camera when I was almost done but the next pictures should show what I did and what you should avoid.
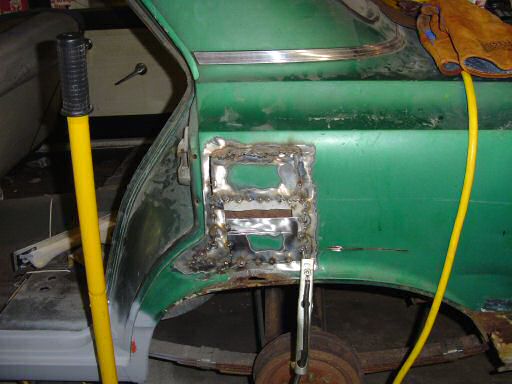
Other than the ill-fitting seam on the top part, this shows a very common repair method. What I ended up with was a quarter inch of missing metal when all of the parts were measured for fit. To make up for that gap, I tacked a couple of inch wide metal strips to the car. Using strips like this does make the repair much easier but what it does is create a bunch of places for water to get trapped in. Keep in mind that the reason for this hole in the first place was because there's no normal access to this area of the car so you can't get in there to seal it up.
The next picture shows all of the parts tacked into place and what happens when you try to close up a way to big gap with out any type of backing.
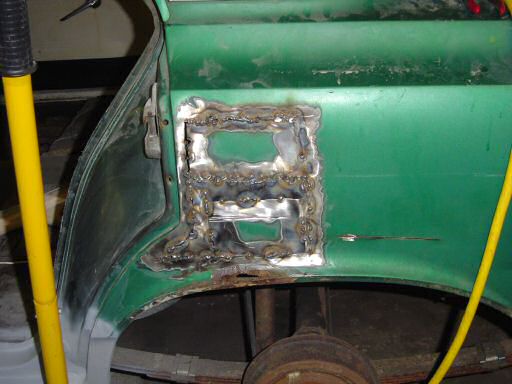
A proper repair would be to weld all of the gaps shut and also make sure that all of the parts are at the correct level. Not welding everything together is going to let the panel move around more than it should which not only means the panel isn't as strong as it should be, but also that the filler I'm going to slather on it to make it look decent is more likely to pop off.
The last big no-no I'm going to do with this in the interest of fast is to use filler to take care of the big gap on the edge of the top part and the slice to the right of the "repair". Body filler is meant for minor imperfections (very small dings, stray grinder gouges, etc...) and is not at all structural.
Initially, the filler will hold very well since it will form a key in the gaps like plaster over wood lath. The problem is that just like plaster, plastic filler dries hard, becomes brittle, and the keys eventually break off from vibration. The vibration caused by driving the car will make this happen pretty quick. Using a fiberglass reinforced filler (which I'm not even doing!) will slow this down but eventually, the key will break off and the filler will fall out. A better repair would be to either put a metal strip behind it or, preferably, make a new part and fit it properly.
Before I wrap this up, I just want to say again that the methods I'm using for the Happy Monday repairs are not recommended. The techniques shown have been used many times in the past by many people but the result is always the same -- rust and body filler falling off. Always butt weld where possible and fill in holes with metal and you'll have long lasting repairs.
Up Next: Part 18 - Rocker Rust -- Seeing Green
Last Updated 05/28/04 09:17:32 PM